BodymindResources.com
Carpal Tunnel / Thoracic Outlet Lab
Welcome to the Carpal Tunnel/Thoracic Outlet Syndrome Lab! I have combine the lab of these two classes because most often, if there is trouble in the carpal tunnel, there are also issues that could affect the brachial plexus as well. It is my opinion that it is best to treat for both as the arms are not separate from the shoulders, neck or rib cage in any real way. Those of you with very advanced cases of carpal tunnel or thoracic outlet may find that you cannot perform some of the more manual exercises due to the lack of motor function or pain in your hands and forearms. Try to be creative. How can you achieve the same effect using different parts of your body or maybe through incorporating some blunt tools. Whatever you do, be extremely careful and check all of it out with your primary health care provider before attempting it. Remember too that there is no need to plow your way through the tissue. A gentle approach works best and it should not be painful. In the case of carpal tunnel, you should begin by reducing the swelling before you begin any serious work. It may take days to get the swelling down (more if you are not able to rest your hands). Work at it many times a day. Give it your best shot. When you feel the inflammation in your wrists is calming down, then you may carefully begin the other exercises. This doesn't have to happen overnight. Go slow and do NOT cause yourself more pain. This doesn't have to hurt
1. Reducing Swelling
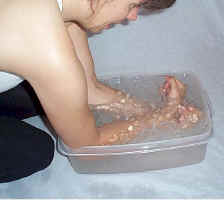 Ice is wonderful for reducing swelling. Fill a bag with
ice and place it over the area that is inflamed. Keep it there just
until the area goes numb. Then remove it and repeat the process. This
creates what is call a vascular flush. Your veins constrict and release in
such a way that drains excess fluid from the area. In the case of carpal
tunnel, you would do best to rest your hands and forearms in a bin of ice
water just until you can no longer feel the cold. Then remove them. Let
them return to normal and then repeat.
2. Lymph Drainage
 Lymph Drainage is another component to reducing
swelling. Vessels for the drainage of lymph fluid exist directly
underneath the skin so you pressure need only be very light. Start in the
crease of your elbow making circular movements. Then use your opposite
hand to jostle the skin of your entire forearms for about a count of 20.
Then lightly glide your hand over the skin from the wrist to the elbow
about 20 times. This will begin the drainage process.
Another thing to consider is that physical exercise is a powerful lymph drainer for the entire body. The above exercise is meant to benefit those with carpal tunnel syndrome. Those of you with thoracic outlet syndrome should consider gentle physical exercise to help speed up the drainage of your entire body. This can be done in as little as 5-10 minutes a day. Just enough to really get your heart rate up.
3. Manual Forearm Release
If there has been much inflammation in the forearms from
carpal tunnel, you can bet that the tendons and muscle have become stuck
together. This exercise is designed to begin the process of releasing
these restrictions. I will show you how to do this with the elbow, but
those of you without pain in your wrists can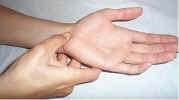 may use your fingers to
really get in between the tendons down near the carpal tunnel. Please be
careful. These techniques are powerful and you do not have to push hard.
Do not allow yourself to push to the point of pain. Simply release the
first layer, then go back and release the next layer and so on. Take it
slow. Never move your stroke towards the wrist. This will just push the
fluid into the carpal tunnel. Move your stroke either up
  towards the
elbow, or sideways across the forearm. While performing these strokes play
with contracting and relaxing the muscles underneath your elbow. You do
this by moving your wrist around.
We will be releasing both the flexors and the extensors
of the wrist. Begin down by the carpal tunnel of the wrist. Sink your
elbow into the tissue 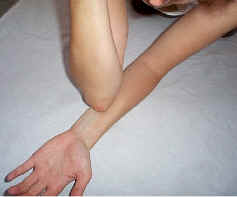 slightly. Move your elbow up the arm creating a
moderate tug on the tissue. Continue up the arm until you reach the elbow.
Perform this action a few times making a point to cover the entire forearm
front and back. Play with contracting and relaxing the muscles as you
perform the stroke. Play also with moving sideways across the muscles.
Study the pictures of the forearm muscles as you work so you know where
you are.
3. Flex Extend Wrist Roll
This is a great warm up to any wrist intensive work day! It is also an important stretch for the muscles of the wrist and carpal tunnel. If you cannot make a fist to perform these movements due to nerve impingement, use your other hand to assist you in stretching.
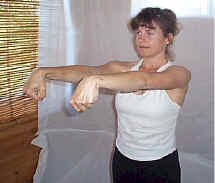
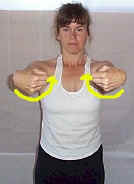
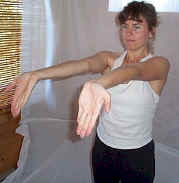
Hold your hand out in front of you. Make a fist and flex your wrist. Slowly rotate your wrist around feeling the stretch, then open them so that your palms are facing upwards. Now extend your wrists. Feel the stretch. Make a fist again and slowly rotate them back their original position. I would do this over and over again for about five minutes a day.
4. Thumb Stretch
This stretch is designed to stretch the tendon in the wrist that operates the thumb.

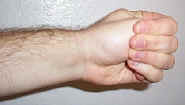
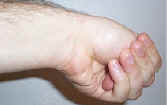
Begin by wrapping your fingers around your thumb. Then stretch your wrist downwards as shown tugging on your thumb. You should feel a stretch in the tendons of your lateral wrist (thumb side). Hold this stretch anywhere from one to five minutes. You do not need to create a forceful pull. A gentle sustained tug should suffice. When you come out of the stretch be sure to come out slowly. This stretch is to be performed once per day.
5. Brachial Chain Stretch
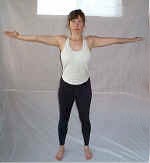 This is stretch is designed to balance the front of
everything between your left hand and your right hand with the backside of
everything between your left hand and your right hand. It balances front
to back. All you have to do is raise your arms out to the side at shoulder
level and actively reach away from your body. Make sure your arms are
twisting so that your palms are facing upwards. Your are not to reach
backwards or forwards. Just reach straight out to the side and hold it for
as long as you can. Make sure you breathe fully in this stretched
position.
6.Neck Stretch
Before we begin, I need to give you a word of caution. These are neck rolls and they must be performed very carefully and very slowly. You must be very aware of any pain you may feel while slowly rotating your neck especially when you are bending it backwards. There is no reason to injure yourself unless you are careless. When you bend your neck backwards, it is imperative that you keep your mouth shut and your teeth together! With that said, let's begin.
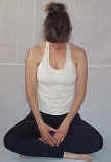

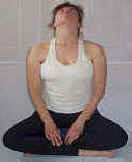
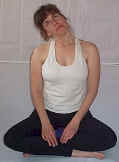
Sit down on the floor or in a chair so that your spine is relatively straight. Allow your head to drop forward and hang for a slow count of 10. Remember to breathe releasing your head more and more with every breath. Then slowly rotate your head to the left and allow it to hang for a slow count of 10. It is very important here that you actually achieve a curvature of the cervical spine (the neck part of the spine) to the left. See if you can achieve a greater, more balanced curve of the cervical spine every day that you do this exercise. After counting slowly to 10, carefully rotate your head backwards making sure to KEEP YOUR MOUTH SHUT. Slowly count to 10 and the carefully rotate your head to the right. Again make sure you are achieving a nice curve of the cervical spine. Slowly count to 10 and then rotate your head down and allow it to hang forward for a count of 10. Then come back the way you came. Slowly rotate the head to the right. Hold for ten. Keeping your mouth closed, slowly rotate your head backwards and hold for 10. Carefully rotate it to the left and hold for 10. Then rotate it down and allow it to hang forward and hold it for 10.
The above paragraph constitutes one repetition of the neck stretch. Ideally I would like you to do four repetitions per day. As you are rotating your head, if you find that there are places of tension that lie between your destinations of forward, right, left, and back, feel free to stay on those spots and stretch them out too. If you stick with this your neck will feel great and your face will start to look more youthful!
7. Manual Scalene, Subclavius, and Pectoralis Minor Release



To release these you will, to some degree, have to learn the art of palpation. To begin learning this art, please study the palpation section at the bottom of Class 1 Lab of the Heal Thyself Series. It involves patiently touching and exploring the tissues of your body. This patient exploration actually brings about a release in the musculature and connective tissue. You would do well to put yourself through the entire Heal Thyself Series. Please study the anatomical pictures of where these muscles lie on the body and the pictures of how the model is accessing them. From here your exploration is personal. Go in and feel for tension in the tissue. When you find something that is hard, touch it, explore it and be present with it until it turns soft. This is an elusive art, but well worth learning. When you release your fingers from a point, see if you can feel the new blood rushing in to heal the area. Take you time with this. If you have not been through the Heal Thyself Series, you have a learning curve ahead of you. Have fun.
8. Rib Aligner Raise your arms out to the side and reach them over your
head with your palms touching. Let your head fall back to gaze at your
hands as you actively reach upwards. From this position, breath fully.
Become very aware of the expansion of your ribs as you inhale. Maintaining
your reach , reach your hands over to the left. Take Ten deep inhalations
and exhalations. Never stop reaching! Then come up and reach to the right
for ten full breaths. Then reach straight up for ten more breaths. Then
bring your arms down slowly with your palms facing upwards. Hopefully you
should now feel your shoulders and arms are directly on top of a wide
ribcage. Relax and breath.
This is similar to the side stretch I taught you in
class 1, but with one addition. Spread your feet about three feet apart.
Strongly reach your arms out to the side. Never stop reaching even for a
second. Continuing your reach, bring your right arm up over your head
reaching towards your left while simultaneously bending your trunk to the
left. Brace yourself by placing your left hand on your left leg and
bending the left elbow. Reach out feeling your stretch all the way down
your arm to your low back. From this position, blow every last inch of air
out of your lungs as you maintain your reach. I mean really push it all
out. Then once it is out, open your mouth and take as deep and 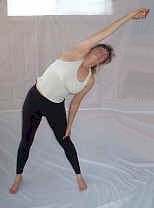 forceful
and complete a breath as you possibly can. Fill to maximum capacity and
make sure you use this opportunity to reach ever farther with your
stretching arm. Perform this three times and then move your arm to reach
slightly forward about 30 degrees from where your were reaching before.
You will feel the
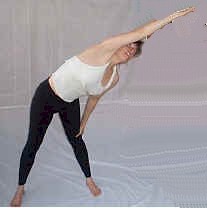 stretch move to you low back and the backs of the ribs.
Maintain your reach as you force out ever last inch of air. Then, once
again, reach as you forcefully blast your ribcage open with a complete
breath. Perform this three times in this position and then repeat these
two positions on the opposite side of your body. Before you switch sides,
however, take a second to feel what it feels like to have one side more
open than the other.
10. Door Stretch
Find a doorway in your home and stand in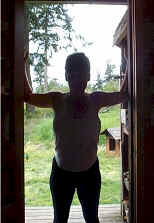 front about a
two feet away from it. Place the entirety of your forearms hand to elbow
on the sides of the door about shoulder height and lean forward. You
should feel this stretch in the muscles on the front of your chest. If you
want to get an extra stretch you can switch of leaning in on one side more
than the other. I'll leave it up to you how long you want to hold this
stretch. You know, if you hold it for five minutes on each side, you will
have seriously changed the strcuture for the better because you will have
released a great deal of connective tissue restrictions. In any case
remember to breath calmly and fully in these stretches.
11. Power Breath
This next exercise is a very powerful way to oxygenate the blood, relax the body, expand the ribcage and sharpen the mind.
Inhale on a count of 7. This means that by the time you get to 7, your lungs are filled to their absolute maximum capacity.
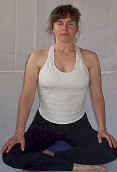 Hold this air in for a count of 28. Holding it this
long
allows you to maximally absorb the oxygen you have taken in. Usually when
we breathe, a great deal of our oxygen is exhaled before we can even
assimilate it. This exercise will actually increase your red blood cell
count!
Exhale the air slowly on a count of 14.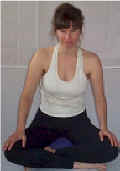 Taking this long
to release the air actually allows toxins to be expelled in the form of
gas from your lungs.
That is one repetition of the Power Breath. Do no less than 10 of these per day. Ideally you should do 30 of these per day. Find a place with nice scenery to look at as you hold your breath. It's a great way to start your morning or wake up if your afternoon is starting to drag.
So that is the Carpal Tunnel / Thoracic Outlet Syndrome Lab. I realize you may not have time to do all of these stretches every day, but do you best. They can help you. In advanced cases, it is important that you work closely with a qualified health care practitioner. The above is not medical advice and should not come before the advice of your doctor.